|
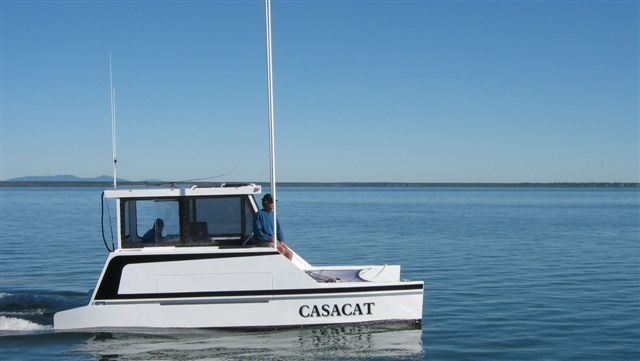
The "Casa Cat"
folding and trailerable cat for the home builder. This project page Under construction, many more
photo sections and text to come... keep an eye out for this one.. |
|
|
 |
|
|
Part 1 Introduction... general instruction and
forming the panels |
The
Casa Cat has been designed
for the amateur builder who wants a roomy, safe and comfortable
trailer boat with good load carrying capacity. Casa Cat is 6.3m
(20'7") in length and 1.98m (6'6") wide on the trailer.
Expanding Casa Cat to it's on the water beam of 3.7m (12'2")
is simple and easy with the telescopic arm arrangement and powered
lifting mechanism, performed whilst on the trailer.
Aimed at the amateur boat builder, simplicity and speed of construction
with readily available and proven materials was important. Ply/wood/epoxy
composite was chosen for its strength, ease of use as most tools
required will be found in any handyman's shed, and with a 2 pack
polyurethane topcoat you have a craft that will still be going
strong in decades. Bringing this boat home with you makes it
so much easier for those routine maintenance jobs that all boats
require and not having to pay for marina storage saves a small
fortune. Ideally, keeping your boat under cover at home means
it will still look like new for years. Building the boat does
not require a strongback or temporary frames and can be built
in a garage or carport with much of the work performed at a comfortable
working height. The trailer can be cut out and assembled on a
flat floor after you have built the boat. Most fairing and painting
is done on a horizontal plane as the hulls and pod can be easily
turned over.
I designed Casa Cat for my own use but have plans available for
others that are after the same qualities in a trailer sailer
I am. To this end an extensive portfolio of photos were taken
during construction, very detailed plans drawn and a complete
record of materials and cost kept to aid builders. The following
text and pictures are typical of what's included with the plans,
though nowhere near as comprehensive. |
 |
Scarfing ply sheets
A scarfing attachment fitted to a circular saw makes for an easy
job and an accurate scarf. |
 |
Ensure the edge to be scarfed is well
supported. The straight edge is there for this purpose. |
 |
Scarfed sheet and offcut. |
 |
All panels are cut out and dry fitted
before final assembly with epoxy. Temporary screws are used to
hold the pieces while the epoxy cures. Drill holes (square with
the ply sheet) through the timber the diameter of the temporary
screws. Here I'm using a drill press. |
 |
It's easier to fix the timber in the
correct position working from the top, rather than drilling through
the ply and screwing from the underside. Dry fit the panels and
mark the position of each piece to make it easier to locate in
the correct position when fixing permanently with epoxy. |
 |
Epoxy gluing timber and ply.
Sand across the grain of the timber before gluing. |
 |
Same to the ply sheet. |
 |
Dust off the faces to be glued. |
 |
Prime the ply with epoxy and allow it
to soak in but not to cure completely before gluing the two surfaces
together, and don't forget the end grains. End grains need more
coats of epoxy as they are more porous. |
 |
Prime the timber too. Whenever you can
ensure you work wet on wet with epoxy to ensure a good bond,
and to save sanding if it has cured. |
 |
Apply thickened epoxy to both surfaces
to be glued. I use Cabosil added to the epoxy for structural
bonds. Ensure you have 100% contact between the two surfaces
you are gluing. Screw the two pieces together and leave in place
while the epoxy cures. Clean up as you go, you don't want to
be sanding this mix when it's gone hard. Screws are only used
to hold pieces together while the epoxy cures, and then they
are removed. There are a few instances where screws are permanently
left in place, so use stainless steel (304 grade) and wash them
in acetone before use to remove any oil residue. |
 |
After the resin has cured remove the
temporary screws and wet out the holes with epoxy with the aid
of a pipe cleaner. If the screw heads contain cured epoxy making
the screws difficult to remove, heat the screwdriver tip and
it will melt the epoxy on contact, allowing easy removal of the
screw. |
 |
Then fill the holes with thickened epoxy.
Clean up paint brushes, tools and excess epoxy with white vinegar
and/or acetone (vinegar is good for cleaning the film from the
inside your car windscreen too) |
 |
A squeegee is handy for spreading resin,
especially for the first (soak) coat. I soak coat some panels
on both sides before final assembly as it keeps the ply stable
and it only require a light sand to ensure a good bond with the
next coat. |
 |
Hull construction.
Glueing scarfed sheets together with Cabosil thickened epoxy.
Mate sheets as accurately as possible to minimise fairing later.
The exposed end grain of the scarf will require more than one
coat of epoxy before gluing with thickened epoxy. Remember to
work wet on wet if time permits. Note plastic sheet on the floor. |
 |
When cured lay the full length panel
on saw stools, using the steel for the trailer to support it,
and fix the framing. You could leave it on the floor but it's
a more comfortable work height on the stools. |

